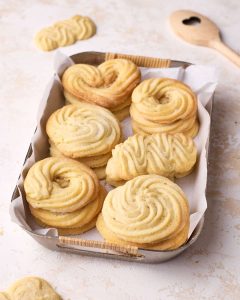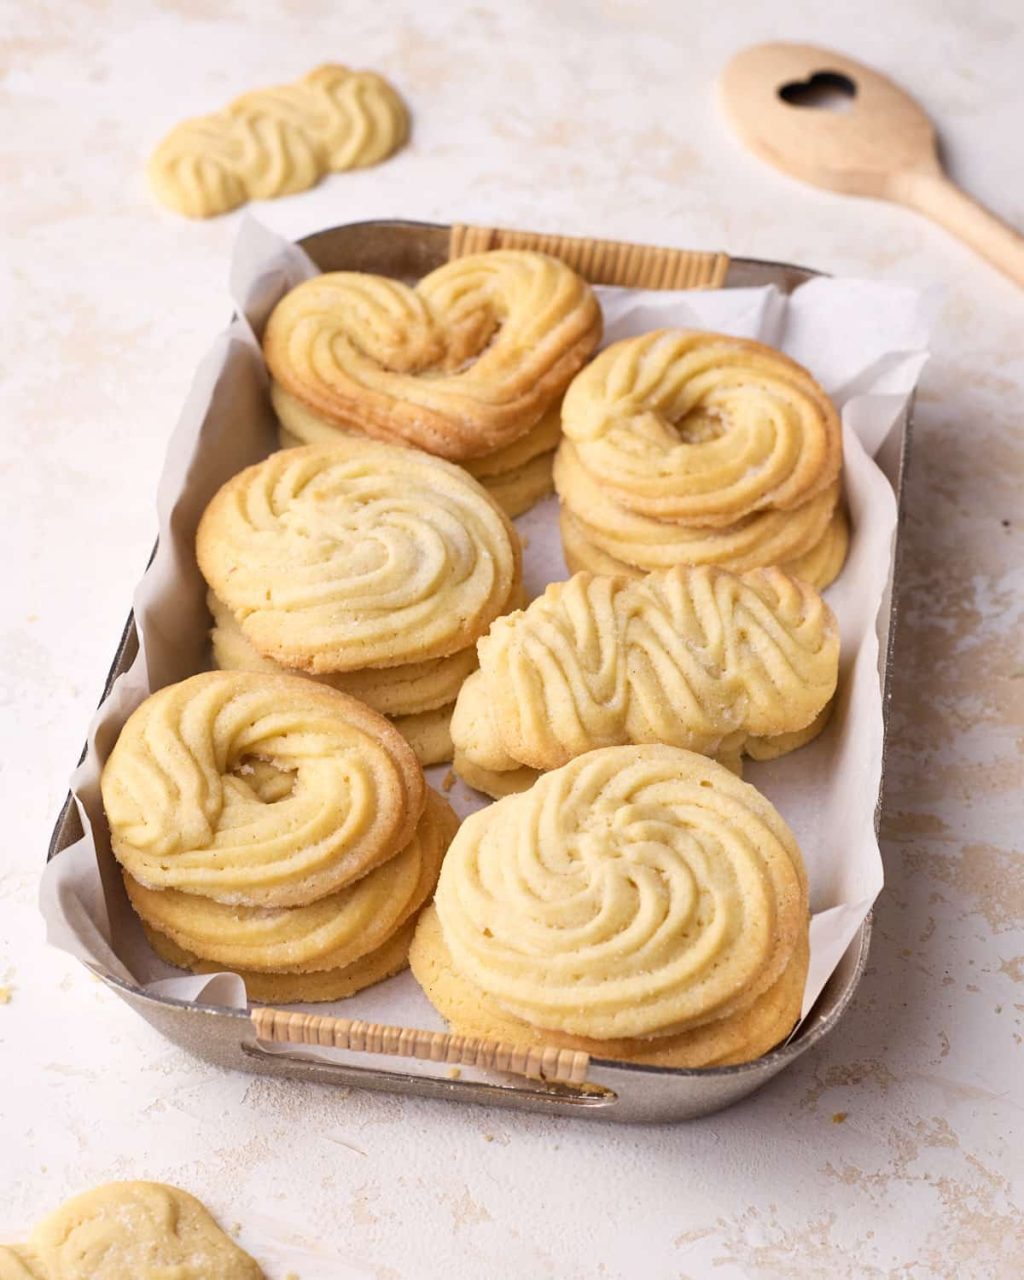
There’s a reason Danish Butter Cookies have remained a beloved classic for generations. Their delicate crunch, rich buttery taste, and distinctive piped shapes make them instantly recognizable. While they’re often associated with those familiar holiday tins, making them from scratch gives you an even fresher and more flavorful cookie.
These homemade Danish butter cookies are crisp at the edges, tender throughout, and wonderfully fragrant. They’re simple enough for everyday baking but elegant enough for Christmas trays, afternoon tea, cookie exchanges, or homemade gifts.
Jessica’s Recipe Science
The texture of Danish butter cookies depends heavily on the butter. Because butter makes up such a large part of the dough, using good-quality butter gives the finished cookies their signature richness and delicate crumb.
Powdered sugar blends easily into the butter and produces a smoother, finer texture than granulated sugar. Egg yolks contribute richness and tenderness, while flour provides enough structure for the dough to hold its piped shape.
Chilling the shaped dough before baking is another important step. It firms the butter so the cookies are less likely to spread, helping them maintain their decorative designs while they bake.
Jump to:
- Why It Works
- Ingredients You’ll Need
- Ingredient Substitutions
- How to Make Danish Butter Cookies
- Expert Tips
- Flavor Variations
- Frequently Asked Questions
- Storage Tips
- Recipe Card
Why It Works
Danish butter cookies keep things simple by allowing butter, vanilla, and a lightly sweetened dough to do all the work.
The soft dough can be piped into traditional rings, swirls, or S-shapes, then chilled briefly before baking. Once baked, the cookies develop lightly golden edges with a delicate, crumbly texture and rich buttery flavor.
Because the ingredient list is short and the preparation is straightforward, these cookies are also an excellent recipe for holiday baking or homemade cookie gifts.
Ingredients You’ll Need
You only need a handful of basic ingredients to make these classic cookies.
For the Cookie Dough
- Unsalted butter – creates the signature buttery flavor
- Powdered sugar – gives the cookies a fine, delicate texture
- Egg yolks – add richness and tenderness
- Vanilla extract – enhances the overall flavor
- All-purpose flour – provides structure
- Salt – balances the sweetness
Optional Decorations
- Sanding sugar
- Coarse sugar
- Melted dark chocolate
- Melted white chocolate
- Sprinkles
Ingredient Substitutions
There are several easy ways to customize the cookies without changing their basic character.
Butter
European-style butter can be used for a richer, more pronounced buttery flavor.
Vanilla
Swap the vanilla for almond, orange, or lemon extract.
Flour
Use a quality 1:1 gluten-free flour blend if you need a gluten-free version.
Citrus
Add finely grated lemon or orange zest for a fresh citrus variation.
Chocolate
Dip or drizzle the finished cookies with melted chocolate for a more indulgent presentation.
How to Make Danish Butter Cookies
Step 1: Preheat the Oven
Set the oven to 350°F (175°C).
Line two baking sheets with parchment paper.
Step 2: Beat the Butter and Sugar
Add softened butter and powdered sugar to a large bowl.
Beat for 3 to 4 minutes until the mixture becomes pale, smooth, and fluffy.
Properly creamed butter helps create a light and delicate cookie.
Step 3: Add the Egg Yolks
Beat in the egg yolks one at a time.
Add the vanilla extract and mix until everything is fully incorporated.
Step 4: Incorporate the Flour
Gradually mix in the flour and salt.
Stop mixing as soon as a smooth, thick dough forms. Avoid overmixing, as this can make the cookies tougher.
Step 5: Pipe the Cookies
Transfer the dough to a piping bag fitted with a large star-shaped tip.
Pipe the dough into circles, wreaths, swirls, or S-shapes onto the prepared baking sheets.
Leave approximately 2 inches between each cookie.
Step 6: Chill
Refrigerate the shaped cookies for 15 to 20 minutes.
This firms the butter and helps the piped designs stay intact during baking.
Step 7: Bake
Bake for 12 to 15 minutes, or until the edges are lightly golden.
Keep a close eye on them toward the end because Danish butter cookies can go from lightly golden to overbaked quickly.
Step 8: Cool
Let the cookies rest on the baking sheets for about 5 minutes.
Transfer them to a wire rack and allow them to cool completely.
Decorate with chocolate or sugar if desired.
Expert Tips
🧈 Use properly softened butter so the dough pipes smoothly.
❄️ Don’t skip chilling the shaped cookies; it helps prevent spreading.
🥄 Measure the flour carefully to avoid creating a dough that is too stiff to pipe.
⭐ A large star tip gives the cookies their classic ridged appearance.
🍪 Remove the cookies once the edges are lightly golden for the best texture.
Flavor Variations
Chocolate-Dipped Danish Cookies
Dip one end of each cooled cookie into melted dark or milk chocolate and let set.
Almond Butter Cookies
Use almond extract instead of vanilla for a delicate nutty aroma.
Lemon Butter Cookies
Add about 1 teaspoon of finely grated lemon zest to the dough.
Orange Butter Cookies
Replace some of the vanilla flavor with orange extract and fresh orange zest.
Festive Sugar Cookies
Sprinkle sanding sugar over the piped dough before baking for a colorful holiday finish.
Chocolate Drizzle Cookies
Drizzle cooled cookies with melted white or dark chocolate for an elegant presentation.
Frequently Asked Questions
Why did my Danish butter cookies spread?
Warm dough is one of the most common causes. Chill the piped cookies before baking so the butter firms up and the shapes hold better.
Can I prepare the dough in advance?
Yes. Keep the prepared dough refrigerated for up to 2 days. Let it soften slightly if necessary before piping.
Can Danish butter cookies be frozen?
Yes. Baked cookies can be frozen for up to 3 months. You can also freeze portions of dough and bake them later.
Why did my cookies turn out too hard?
Too much flour or baking them for too long can result in overly hard cookies. Measure the flour accurately and remove the cookies when the edges are just beginning to turn golden.
Which piping tip should I use?
A large open-star piping tip works particularly well because it creates the ridged edges associated with traditional Danish butter cookies.
Storage Tips
Room Temperature
Keep completely cooled cookies in an airtight container for up to 1 week.
Refrigerator
For longer storage, seal the cookies well and refrigerate for up to 2 weeks.
Freezer
Freeze baked cookies in an airtight freezer-safe container for up to 3 months.
Let them return to room temperature before serving.
Danish Butter Cookies Recipe Card
Classic Danish Butter Cookies
⭐⭐⭐⭐⭐
These crisp and delicate Danish butter cookies are made with rich butter, powdered sugar, and vanilla, then piped into beautiful shapes and baked until lightly golden. They’re perfect for holidays, tea time, cookie exchanges, or homemade gifts.
Prep Time: 20 minutes
Chill Time: 20 minutes
Bake Time: 15 minutes
Total Time: 55 minutes
Yield: 30 cookies
Category: Dessert
Method: Baking
Cuisine: Danish
Diet: Vegetarian
Ingredients
- 1 cup (226g) unsalted butter, softened
- ¾ cup powdered sugar
- 2 large egg yolks
- 2 teaspoons vanilla extract
- 2 cups all-purpose flour
- ¼ teaspoon salt
Instructions
1. Preheat: Heat the oven to 350°F (175°C) and line two baking sheets with parchment paper.
2. Cream: Beat softened butter and powdered sugar until pale and fluffy.
3. Add Egg Yolks: Beat in the egg yolks one at a time, followed by the vanilla.
4. Mix Dough: Gradually add flour and salt, mixing just until a smooth dough forms.
5. Pipe: Transfer dough to a piping bag and pipe decorative shapes onto the baking sheets.
6. Chill: Refrigerate the shaped cookies for 15–20 minutes.
7. Bake: Bake for 12–15 minutes, until the edges are lightly golden.
8. Cool: Let the cookies cool briefly on the baking sheet, then transfer to a wire rack.
Notes
🧈 Use good-quality butter for the best flavor.
❄️ Chilling the piped dough helps prevent the cookies from spreading.
🍪 Watch the cookies closely during the final minutes of baking.
🍫 Add a chocolate dip or drizzle for an extra-special finish.
Author: Daniel Wilson